10 Things To Remember When Installing Any New Faucet
Share this Article

Faucet Installation Tips
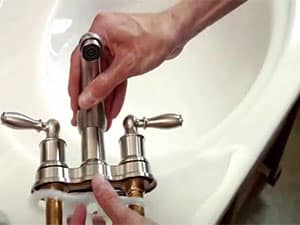
Although it is a simple job, installing a new faucet can be challenging. Because of the location of the faucet, the tricky part is accessing the parts, says your local Santa Cruz plumber. You will probably end up on your back reaching up behind the sink to loosen the faucet mounting nuts, while at the same time, it will be necessary to navigate past the supply and waste lines, working in an area that provides little, if any, elbow room.
The most referred Santa Cruz plumber recommends that you install a center-set one-piece faucet, (any faucet for that matter), with the sink out of the vanity or countertop. In some cases, it’s easier to pull off a vanity top than it is to replace a faucet with the sink in place.
A center-set faucet is basically one piece and it’s the simplest faucet to install. The valves on most faucets of this type, says your Santa Cruz plumber, are spaced on 4-inch centers – something to keep in mind when shopping for both a sink and a faucet. Many newer sinks have 8-inch -on- center spacing and require the use of a widespread faucet.
 BONUS TIP: With a center-set faucet, the handles and spout all share a common base. Widespread (the faucet is made up of separate components), allows more flexibility in the spout and handle placement, but are more complicated to install.
Plumber Pro Tips
Tip #1 If you’re replacing a faucet, take the time once you’ve pulled out an old faucet to remove any old putty or caulk from under the faucet. If you don’t, you may not get a good seal under the new faucet.
Tip #2 Use a plastic putty knife to scrape away most of the old sealant. Then clean the surface thoroughly with a soft rag and some denatured alcohol.
Tip #2 To install the faucet, start by preparing the faucet. To create a watertight seal between the base plate of the faucet and the sink, slip the gasket provided onto the bottom of the faucet. Alternatively, use a trick that many plumbers use. (See plumber trade secret below.)
Tip #3 Once you’ve applied the plumber’s putty or a gasket, slip the faucet through the hole (s) in the sink.
Tip #4 Thread the mounting nuts (or bracket nut) onto the faucet.
Tip #5 Check to make sure that the faucet is centered on the sink and fully tighten the valve nuts or bracket nut.
Tip #6 Remove any that squeezed-out with a plastic putty knife. Then wipe with a damp cloth.
Tip #7 Install the drain body into the sink. Start by applying a coil (bead), of the plumber’s putty around the lip of the drain or under the lip of the drain flange.
Tip #8 Push the drain body up against the underside of the sink drain and screw the drain flange onto the drain body. Again, remove any excess putty that has squeezed-out.
Tip #9 With the drain body in place, install the rest of the pop-up mechanism parts and adjust the mechanism for proper operation. If you’ve installed the faucet with the sink removed, now install the sink.
Tip #10 Connect the faucet to the shut-off valves using chromed supply lines or flexible supply lines; connect the tailpiece to the trap and existing waste line.
PLUMBING TRADE SECRETS: Throw away the gasket and pack the cavities under the base plate with the plumber’s putty. This will take quite a bit of putty, but it’s inexpensive and will create a lasting seal.
WHAT CAN GO WRONG: Whenever you install a new faucet, particularly if you’ve altered the supply lines, you should always remove the faucet’s aerator before turning on the water. That’s because there is frequently debris in the lines that would quickly clog up the aerator. With the aerator removed, turn on the water and flush the system. When the water runs clear, turn off the faucet and reinstall the aerator.
Published on: July 3, 2014
Updated: February 26, 2022


